We had my niece over yesterday night to celebrate her birthday. I'd bought this genius cupcake decorating book,
What's Up, Cupcake?, a few months ago and really loved the red sparkly apple cupcake design and was dying to try it. Then, it occurred to me that my niece is a big fan of scary movies like Snow White so I could make it a Snow White and the poison apple theme.
The cupcakes were a big hit (or at least a topic of conversation). What I didn't anticipate was that my 3 1/2 year old would have a melt down because he couldn't have the Snow White cupcake.
p.s. This will be the first and last time that I use heavy food coloring for anything that's in our house. We have a lot of laundry to do today!

When we were packing to move to our house about 3 years ago, I discovered we had lots and lots of random wrapping paper ribbons, etc. It seemed ridiculous and I hated trying to buy the right wrapping every time I bought a gift. After trying to use up most of what we had, I decided to do a signature wrapping style instead. I LOVE it now and would never go back. I choose brown paper (usually a chocolate color but sometimes craft paper) which works really great because it can go with kid themes, flowers or just look elegant with a nice blue, cream or pink ribbon.
The picture above was a gift for a kitchen themed bridal shower. I found a "flower" pancake turner with a hole in the center that I put a bouquet of paper flowers through. I made the flowers from a Martha Stewart kit from Michaels. A few people at the shower thought the flowers were real! I love how this one came out.
The pictures below are adapted from a cow card kit from Paper Source. I've done the majority of kids birthday gifts from last year in this cow style.

After running out of the cows, I started experimenting with other kid styles. This one uses a matchbox or hotwheels car.
And flower and butterfly styles (also made from Paper Source kits) . . .
I just got back from a business trip to China. It was my first time there. While there, we were invited to a dinner. Anyway, one of the guys here from the US is vegetarian and so they took us to this totally crazy vegetarian restaurant- the kind where they try to recreate real meat dishes. The (male) waiters had metallic tunics on with pearl necklaces. We were in a private room and my chair was connected to the person next to me so every time he'd move back, I'd get moved too. They had this elaborate table setting with lotus leaves under plates and these super long menus that were like glossy magazines insides with menu items with names like "the person who loved me but got away".


I got a pineapple lemonade which was about the most pedestrian drink they had. They first brought out containers that looked like glass vases that you might put candies in. They were filled with picked carrots and something else. Then came seaweed cones filled with veggies (pretty tasty), then "sushi" on ice with dry ice and flowers for effect.
A few things came after that (a small slice of BBQ "chicken"? and something else) at which point I was full and though "that was a fun meal". Well, then came the mushrooms, then the "steak" course, a "mouthwash", then the vegetable couse (as themselves, not masquerading as anything else), then soup! I barely ate anything after the steak. Dessert was watermelon. I was a little disappointed that course wasn't more dramatic but glad the food had come to an end!
One night when Luke didn't want to get out of his fire outfit to put on his PJs, he told me "well, maybe you need to make me firefighter pajamas." We couldn't find any good ones on line so I made these.
If you want to make these, you'll need:
- White T-shirt
- Cotton/PJ pants (you can buy them or I make them from copying a pair of PJs that fit well)
- Ribbon for suspenders
- Reflecting material (sold like ribbon)
- Thread
- Optional: Fire patch or "SJFD" letters (or initials whatever city you live in). I didn't add these yet so it's not shown in the pictures
The steps are
1. Sew the ribbon on each side of the shirt to make suspenders
2. Sew the reflecting material to the bottom of the shirt
3. Optional: sew on a patch to the side or iron on letters to the center of the chest
4. Sew reflecting material stripes towards the bottom of each pant leg
Posted in
Firefighter pajamas,
how to make
Jen and Beth with their projects. They came out great! (see instructions in my last post)
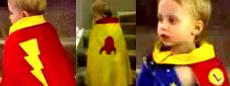
SuperLuke getting ready for bed.
My husband was even inspired to start on a T shirt to let his students know there'll be a test the next day. We'll see if it works!
First of all, I was super excited to find a site that had a whole section on crafts for boys. The site's called MADE (
dana-made-it.com) and the crafts are under "Celebrate the BOY." So cute.

MADE Celebrate the BOY tutorialI chose this craft for the playgroup Mom's night this week because it's easy, fun and you can really individualize it. Detailed instructions for how to do the craft are at the link above. The pictures are of my experiment making "smartypants" for the Cutie Patootie.
For this project, you'll need:
- Freezer paper (not wax)- I was able to find this at the Safeway on Winchester & Bubb in Campbell and on line (but couldn't find it at Target)
- A silhouette design (you can draw something, print an outline image onlinet, or type out words in a fav font)
- A piece of clothing (or other fabric item)
- Scrap fabric (for covering the painted design during final ironing)
- Soft fabric paint
- Brush and/or Q-tips
- Iron
- X-acto knife
- Cutting board or mat
- Pencil


Giving up your hacis (pacifiers) is hard work! Haci Bear was stuffed with all of the pacifiers we could find around the house.
 We had my niece over yesterday night to celebrate her birthday. I'd bought this genius cupcake decorating book, What's Up, Cupcake?, a few months ago and really loved the red sparkly apple cupcake design and was dying to try it. Then, it occurred to me that my niece is a big fan of scary movies like Snow White so I could make it a Snow White and the poison apple theme.